
Hugging Face smolagents: Intro to Minimalist AI Agents
Table of Contents
Hugging Face’s smolagents describes itself as “a barebones library for agents”. It is a Python library that allows you to create your own AI agent.
AI agents use LLMs to help them make decisions and perform tasks. One such decision could be to use tools, like performing a web search.
In this post I will walk you through how you can use smolagents.
Install
pip install smolagents[gradio,mcp,openai]
Model
The model represents the underlying AI Model. Typically that will be a text model. One of the most common choices is OpenAIServerModel, which connects to any OpenAI-compatible API.
from smolagents import OpenAIServerModel

model = OpenAIServerModel(
    api_key='<api-key>',
    model_id='<model-id>',
    api_base='<api-base>',
    flatten_messages_as_text=<True|False>
)
Because LLMs can be resource-heavy, you may not be able to run one locally. Below are some example API configurations:
OpenAI API
model = OpenAIServerModel(
    api_key='<api-key>',
    model_id='gpt-4o-mini',
    # api_base='https://api.openai.com/v1',
    # flatten_messages_as_text=False
)
OpenRouter API
model = OpenAIServerModel(
    api_key='<api-key>',
    model_id='meta-llama/llama-3.3-8b-instruct:free',
    api_base='https://openrouter.ai/api/v1',
    flatten_messages_as_text=True
)
Gemini API
model = OpenAIServerModel(
    api_key='<api-key>',
    model_id='gemini-2.5-flash',
    api_base=(
        'https://generativelanguage.googleapis.com/v1beta/openai/'
    ),
    # flatten_messages_as_text=False
)
Ollama (local)
model = OpenAIServerModel(
    api_key='dummy',
    model_id='llama3.2',
    api_base='http://localhost:11434/v1',
    # flatten_messages_as_text=False
)
Note: The default context window of Ollama models is usually quite small and you may need to increase it.
Simple Agent
With a model configured, you can create a ToolCallingAgent using default tools:
from smolagents import ToolCallingAgent

agent = ToolCallingAgent(
    tools=[],
    add_base_tools=True,
    model=model,
    max_steps=3
)
agent.run('What is the capital of the UK?')
The default tools are defined by TOOL_MAPPING in smolagents/default_tools.py.
There are other agent classes and we will look into that later. For now let’s look at tools.
Tools
Tools allow your agent to do something useful. One such tool could be a web search.
The following properties are relevant information to the AI:
| Property | Description |
|---|---|
| Name | Unique identifier |
| Description | Help the AI understand when to call the tool |
| Input schema | The list of parameters and their types |
| Output type | Additional information regarding what output type to expect |
The primary purpose of the information is for the AI to figure out what tool to call. All of the available tools will be included in the system prompt. That therefore also consumes input tokens. Don’t go overboard with the description.
Tools will often be implemented by Python functions and all of the above properties can be inferred from it.
Alternatively tools can also be provided via one or more MCP servers.
We’ll look at both options.
Tool From Python Function
You can define a tool from a Python function:
from smolagents import tool

@tool
def add_numbers(a: int, b: int) -> int:
    """
    Adds two numbers.

    Args:
        a: The first number
        b: The second number
    """
    return a + b
This will create the tool with the name add_numbers and description Adds two numbers..
The input schema will be:
{
  "a": {
    "type": "integer",
    "description": "The first number"
  },
  "b": {
    "type": "integer",
    "description": "The second number"
  }
}
And the output type will be: integer
As part of the system prompt, the tool will be described to the AI as:
- add_numbers: Adds two numbers.
Takes inputs: {‘a’: {’type’: ‘integer’, ‘description’: ‘The first number’}, ‘b’: {’type’: ‘integer’, ‘description’: ‘The second number’}}
Returns an output of type: integer
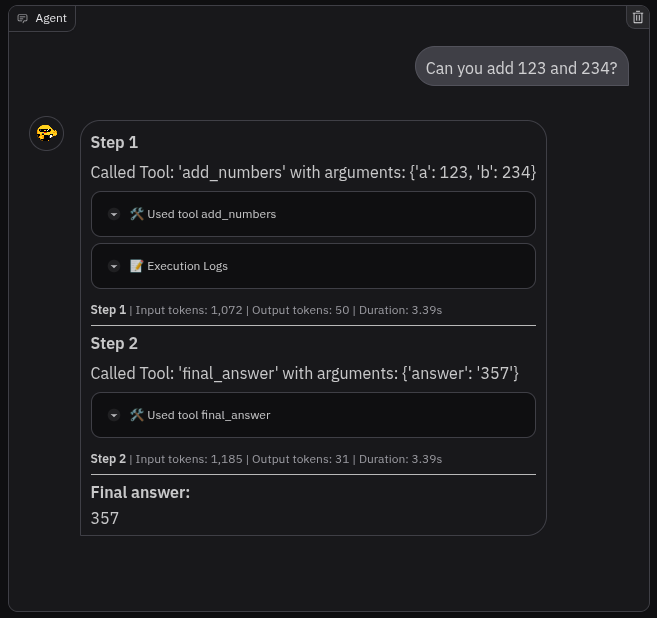
A prompt like the following should make the agent use the tool:
Can you add 123 and 234?
In the Gradio chat you should then see something like that:
Tool From Python Class
You can also define a tool from a Python class by extending Tool. The equivalent tool class example would look like this:
class AddNumbersTool(Tool):
    name = "add_numbers"
    description = "Adds two numbers."
    inputs = {
        "a": {
            "type": "integer",
            "description": "The first number"
        },
        "b": {
            "type": "integer",
            "description": "The second number"
        }
    }
    output_type = "integer"

    def forward(  # pylint: disable=arguments-differ # type: ignore
        self,
        a: int,
        b: int
    ) -> int:
        return a + b
This gives you more control over the input schema. It also allows you to keep something like external connections within the tool instance.
Since we provided the same name, input schema and description, everything else will be the same.
Tools From MCP Server
Using MCP allows you to use one of the growing list of available MCP servers. Or you just use it to build agent agnostic tools.
STDIO
This is how you can integrate an MCP server using STDIO mode (assuming that you have uv installed):
server_parameters = StdioServerParameters(
    command="uvx",
    args=["mcp-server-calculator"],
)

with ToolCollection.from_mcp(
    server_parameters,
    trust_remote_code=True
) as tool_collection:
    agent = ToolCallingAgent(
        tools=[*tool_collection.tools],
        ...
    )
That will run uvx mcp-server-calculator and communicate with the process via STDIO. Make sure you trust mcp-server-calculator before running it.
You could then ask the agent something like:
Please calculate the square root of 16
Streamable HTTP
You can also connect to an MCP Server via the Streamable HTTP transport:
    with ToolCollection.from_mcp(
        {
            "url": "http://127.0.0.1:8000/mcp",
            "transport": "streamable-http"
        },
        trust_remote_code=True
    ) as tool_collection:
        agent = ToolCallingAgent(
            tools=[*tool_collection.tools],
            ...
        )
Example prompt:
Can you add 123 and 234?
MCP Trust and Safety
From the MCP Protocol:
For trust & safety and security, there SHOULD always be a human in the loop with the ability to deny tool invocations.
When running the example, I wasn’t asked to confirm that I would like to run the tool. Currently that doesn’t seem to be a feature of smolagents.
Agents
The smolagents libraries include different kinds of agents. Let’s look at them more closely.
Multi Step Agent
The MultiStepAgent isn’t a standalone agent, but serves as the base class for all other agents, including Tool Calling and Code Agent.
Here are some of the common parameters that you might want to explore:
Init Parameter: tools
List of Tool instances. Make sure to pass an instance and not a class.
Init Parameter: add_base_tools
Whether to include default tools.
The default tools are defined by TOOL_MAPPING in smolagents/default_tools.py.
Currently they are:
PythonInterpreterToolDuckDuckGoSearchToolVisitWebpageTool
Init Parameter: model
An instance of Model, which itself is a callable that will return a ChatMessage response or a list of message dicts.
Init Parameter: max_steps
Limit the maximum steps for an agent can make before it should provide an answer. Complex queries may require multiple steps, but that also depends on the type of agent.
What may happen especially with smaller models is that the agent gets stuck in a loop.
Default value: 20
Init Parameter: prompt_templates
Type: smolagents.PromptTemplates
This allows you to override prompts like the system prompt.
See specific agent for defaults.
Init Parameter: verbosity_level
Type: smolagents.LogLevel
Default value: LogLevel.INFO
Init Parameter: step_callbacks
A list of callbacks that will be called after a step completes or fails. You could use that for extra logging for example:
LOGGER = logging.getLogger(__name__)


def logging_step_callback(
    step: smolagents.MemoryStep,
    agent: smolagents.MultiStepAgent
):
    LOGGER.info("Step: %r, Agent: %r", step, agent)


agent = ToolCallingAgent(
    step_callbacks=[logging_step_callback],
    ...
)
Init Parameter: final_answer_checks
A list of callbacks that will be called before returning the final answer. You could use that to validate the final answer:
def max_length_final_answer_check(
    final_answer: Any,
    memory: smolagents.AgentMemory
):
    if isinstance(final_answer, str) and len(final_answer) > 100:
        raise ValueError("Answer is too long")


agent = ToolCallingAgent(
    final_answer_checks=[max_length_final_answer_check],
    ...
)
Tool Calling Agent
The ToolCallingAgent is what we had already used in above examples.
Its operation mode is to run in a loop and ask the Model for a JSON description of a tool call.
With each step it sends to the Model:
- description of all of the available tools as part system prompt
- previous messages
- user query to the
It finishes when the final_answer tool was called, or when it reached the maximum number of steps.
agent = ToolCallingAgent(
    tools=[],
    add_base_tools=True,
    model=model,
    max_steps=3,
    #  prompt_templates=...
)
Unless you pass in prompt_templates, it will load prompt templates from toolcalling_agent.yaml. The default system prompt is quite verbose with nearly 800 tokens, excluding any direct tool description.
Code Agent
Code Agents are agents that write their actions in code, rather than JSON.
The idea behind Code Agents is that code allows to express more complex logic, often in a single step. That is illustrated by the research paper Executable Code Actions Elicit Better LLM Agents. It is the same research paper linked by the smolagents documentation. It also tested smaller 7B models with promising results.
Let’s have a look at a simple example:
PRICE_BY_PRODUCT = {
    "apple": 1.0,
    "banana": 0.5,
    "orange": 0.75,
    "grape": 2.0,
    "watermelon": 3.0
}


@tool
def get_product_names() -> list[str]:
    """
    Gets the product names.

    Returns:
        list[str]: The product names.
    """
    return list(PRICE_BY_PRODUCT.keys())


@tool
def get_product_price(product_name: str) -> float:
    """
    Gets the product price.

    Args:
        product_name (str): The product name.

    Returns:
        float: The product price.
    """
    return PRICE_BY_PRODUCT[product_name]


agent = CodeAgent(
    tools=[get_product_names, get_product_price],
    add_base_tools=False,
    model=model,
    max_steps=3
)

agent.run("What is the cheapest product?")
When I ran that, it resulted in two steps. The first step was to get the list of products.
product_names = get_product_names()
print("The products list is:", product_names)
The products list is: [‘apple’, ‘banana’, ‘orange’, ‘grape’, ‘watermelon’]
The second step was to get the price for each and return the cheapest:
min_price = None
cheapest_product = None
for product in product_names:
    price = get_product_price(product)
    if min_price is None or price < min_price:
        min_price = price
        cheapest_product = product
print(
    "The cheapest product is", cheapest_product,
    "with price", str(min_price)
)
The cheapest product is banana with price 0.5
This could have easily be done in a single step, but two is good too.
Comparing that with regular sequential tool calling, using the available tools, this would have been at least six steps (one to get the list of products, five each to get the price).
So why wouldn’t you always use code agents?
The benefits of code, are also the downsides when trying to control and limit it. With JSON tool calls, you could use a simple JSON schema to validate it. And a grammar to guide the LLM. You know exactly what tools might get called.
On the other hand, the generated Python code might attempt to use Python functions other than the tools we provided. It might use a lot of memory, a lot of CPU, or end up in an infinite loop. While there are ways to handle those, it is a lot harder with a higher risk of security vulnerabilities.
While smolagents does include a local Python executor, it does itself recommend using a sandboxed environment for security.
Telemetry
Telemetry allows us to monitor our AI agents. Within smolagents, that is similar to sending logs to a server, including all of the prompts, tool calls and responses. Make sure users are aware of that.
Arize Phoenix
We focus here on self-hosted Arize Phoenix.
We are looking at two slightly different approaches.
Integration using arize-phoenix dependency
You can install everything you need by simply installing the telemetry extra of smolagents:
pip install smolagents[telemetry]
Then in your agent code, you can then enable telemetry like so:
from phoenix.otel import register
from openinference.instrumentation.smolagents import SmolagentsInstrumentor

register(
    endpoint='http://localhost:6006/v1/traces',
    project_name='my-app'
)
SmolagentsInstrumentor().instrument()
The endpoint and project_name are optional.
Look up order for endpoint:
- Environment variable
PHOENIX_COLLECTOR_ENDPOINT - Environment variable
OTEL_EXPORTER_OTLP_ENDPOINT - Default: gRPC on
localhost:4317
Look up order for project_name:
- Environment variable
PHOENIX_PROJECT_NAME - Default:
default
Before running your agent, you can start Arize Phoenix like so:
python -m phoenix.server.main serve
While this approach is simpler, there are some disadvantages:
- It’s specific to Arize Phoenix: although you may still be able to connect to other OTLP endpoints
- You need to ship Arize Phoenix with your app: You could minimize that by just installing
arize-phoenix-otel
Integration using OTLP
In this approach we are looking at how we can connect to an OTLP endpoint, without an arize-phoenix dependency as part of our app.
We will need a few more dependencies on the agent side (they are part of the telemetry extra, but so is arize-phoenix which we are trying to avoid in this context):
pip install \
    openinference-instrumentation-smolagents \
    opentelemetry-exporter-otlp \
    opentelemetry-sdk
Then in your agent you can enable telemetry by calling the configure_otlp helper function:
from opentelemetry.exporter.otlp.proto.http.trace_exporter import (
    OTLPSpanExporter
)
from opentelemetry.sdk.resources import Resource
from opentelemetry.sdk.trace import TracerProvider
from opentelemetry.sdk.trace.export import SimpleSpanProcessor

from openinference.semconv.resource import ResourceAttributes
from openinference.instrumentation.smolagents import (
    SmolagentsInstrumentor
)


def configure_otlp(otlp_endpoint: str, project_name: str):
    resource = Resource.create({
        ResourceAttributes.PROJECT_NAME: project_name
    })
    trace_provider = TracerProvider(resource=resource)
    trace_provider.add_span_processor(
        SimpleSpanProcessor(OTLPSpanExporter(otlp_endpoint))
    )
    SmolagentsInstrumentor().instrument(
        tracer_provider=trace_provider
    )


configure_otlp(
    otlp_endpoint='http://localhost:6006/v1/traces',
    project_name='my-app'
)
We still need to run Arize Phoenix somehow. But now that can be as a dev dependency or completely separate. With uv you could run:
uv run --with=arize-phoenix -m phoenix.server.main serve
Arize Phoenix UI
With Arize Phoenix running locally, it would be available under: http://localhost:6006
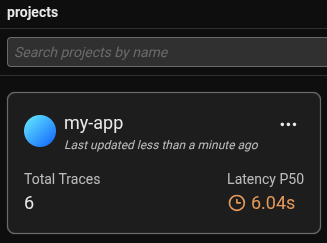
There you should see the project list, including my-app:
Within it, you will find the recorded traces:

Clicking on that will give you more details about each step of the agent:
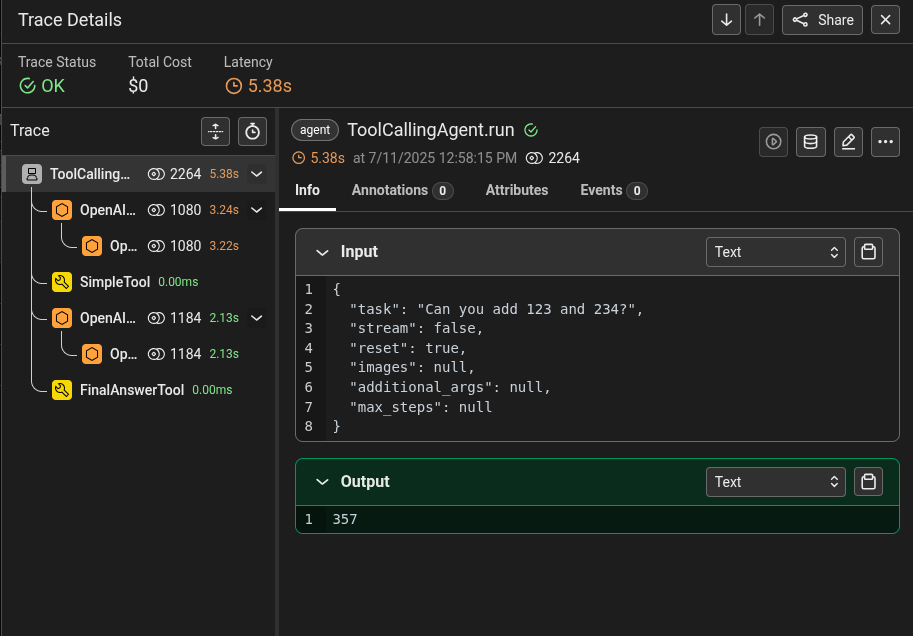
For the individual steps you can for example explore the inputs and outputs and what tools have been called.
Code
You can find self contained examples code in my python-examples repo, under python_examples/ai/agents/smolagents.
Conclusion
Now we’ve covered most of the main features of smolagents to get you started.
What I like about smolagents is that it is fairly easy to get started with, while still being flexible.
I would perhaps prefer if it was leaning more on typing hints to reduce verbose docs that seem unnecessary.
But these are minor and can be worked around easily.
In future posts, I’ll go deeper into planning and multi‑agent systems